


Clouded headlights can cut low-beam output to 22.43% of what a new OEM lamp delivers, which is roughly a 78% reduction in forward light. Restoration can bring that back to about 70% of OEM performance, but it doesn't make the lens brand new.
I've seen plenty of drivers treat hazy headlights like a cosmetic annoyance until they're forced to drive a dark country road, a wet Ontario highway, or an unlit subdivision after sunset. That's the wrong frame. Headlight restoration is a safety job first, because light that never reaches the pavement can't help you spot a pedestrian, a deer, lane debris, or a hard-to-see curve in time.
Why Headlight Restoration Matters More Than Looks
A customer can walk into a driveway at dusk, glance at the front of the car, and think the lenses just look tired. On the road, though, the issue is much more serious. AAA's headlamp-lens deterioration testing found that clouded or yellowed headlights produced only 22.43% of the light output of a new OEM headlight on low beam, which means roughly a 78% reduction in forward lighting before any correction is done, and their later consumer guidance still describes degraded lamps as producing only about 22% of new output. AAA headlamp-lens deterioration research, AAA consumer guidance on headlight restoration and replacement
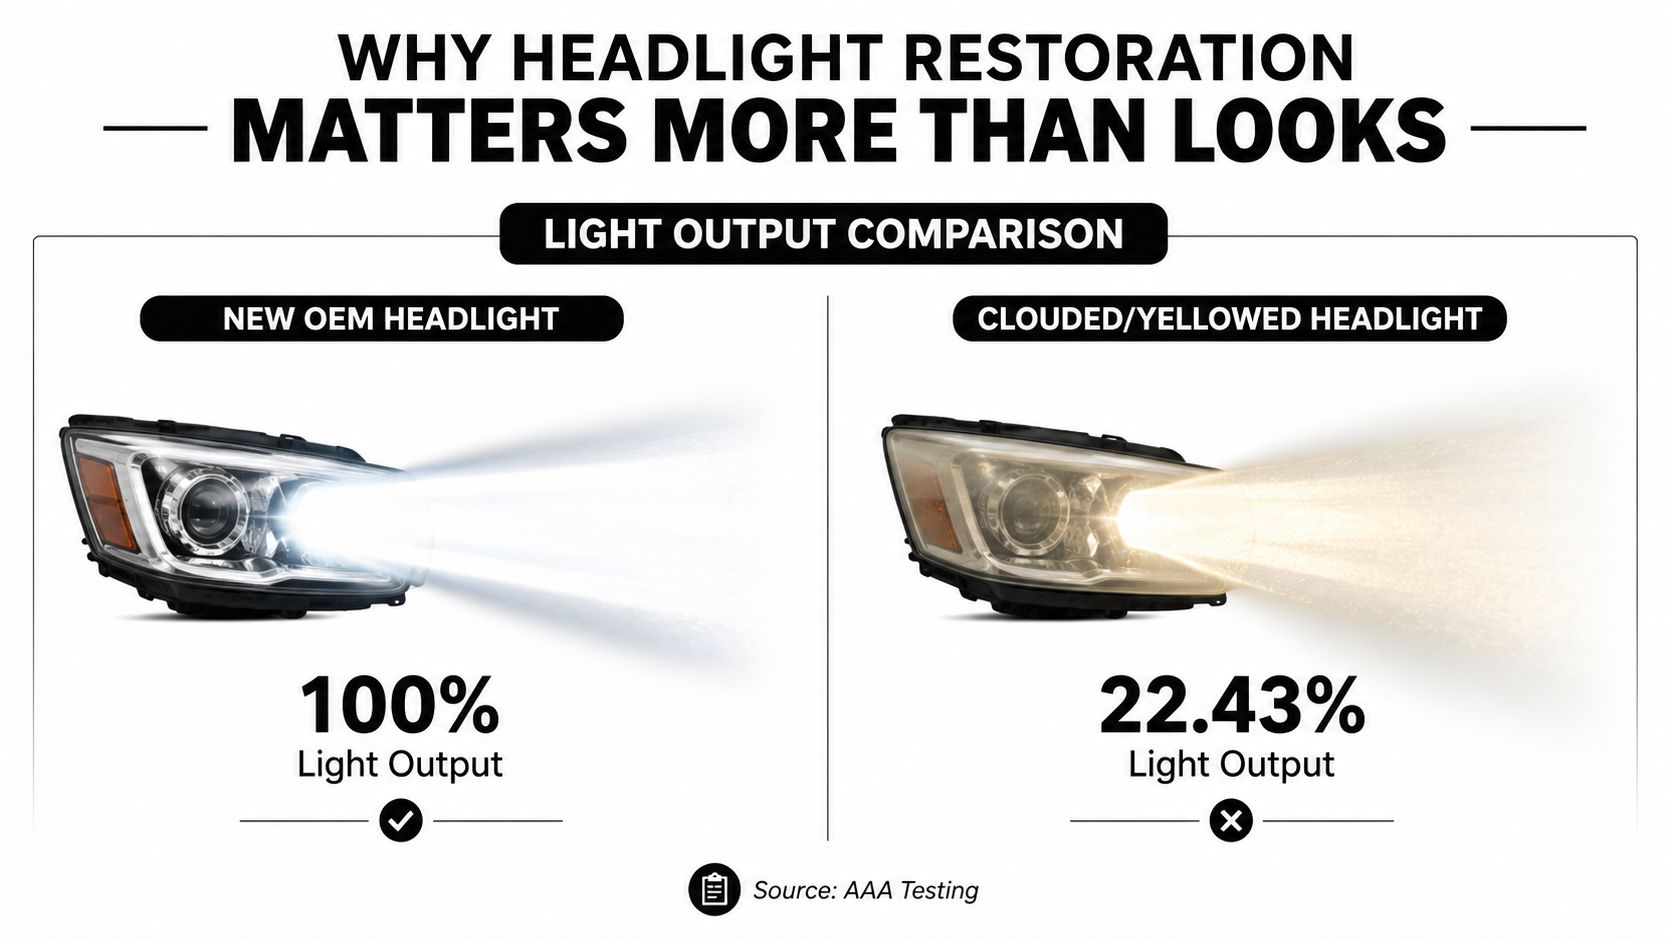
For a driver commuting at night, that gap changes everything. A lens that looks merely a bit dull can leave the car operating with less than one-quarter of its original low-beam performance in the AAA test, and that's before rain, glare, dirty roads, or oncoming traffic make visibility worse. The point of headlight restoration is simple, it removes the oxidised layer that's blocking light and gives the lamp a workable path back to safer output.
Safety matters before appearance
Restoration is not about making a 10-year-old car look brand new in a showroom photograph. It's about getting usable light back on the road, where it belongs. If the outer plastic has gone cloudy, the headlight is scattering and absorbing light instead of directing it.
That's why I always tell owners to judge the job by what the beams do at night, not by how shiny the lens looks in daylight. A clean-looking lens can still underperform if it hasn't been corrected properly. For seasonal upkeep, a basic vehicle walkaround belongs on the same checklist as oil and tyres, and a simple maintenance reminder like this seasonal maintenance checklist helps keep lighting from becoming an afterthought.
Practical rule: if the lens is cloudy enough that you're noticing it in daylight, it's already affecting night driving more than most people realise.
The best mental model is this. Headlight restoration is a recovery process, not a cosmetic polish. It's a middle-ground solution that can restore a large part of the lost performance, but the AAA data also show it doesn't fully return a degraded lamp to new-headlight output, which is why badly worn units sometimes need replacement instead of polishing alone.
How Headlight Oxidation Works and Why Restoration Fixes It
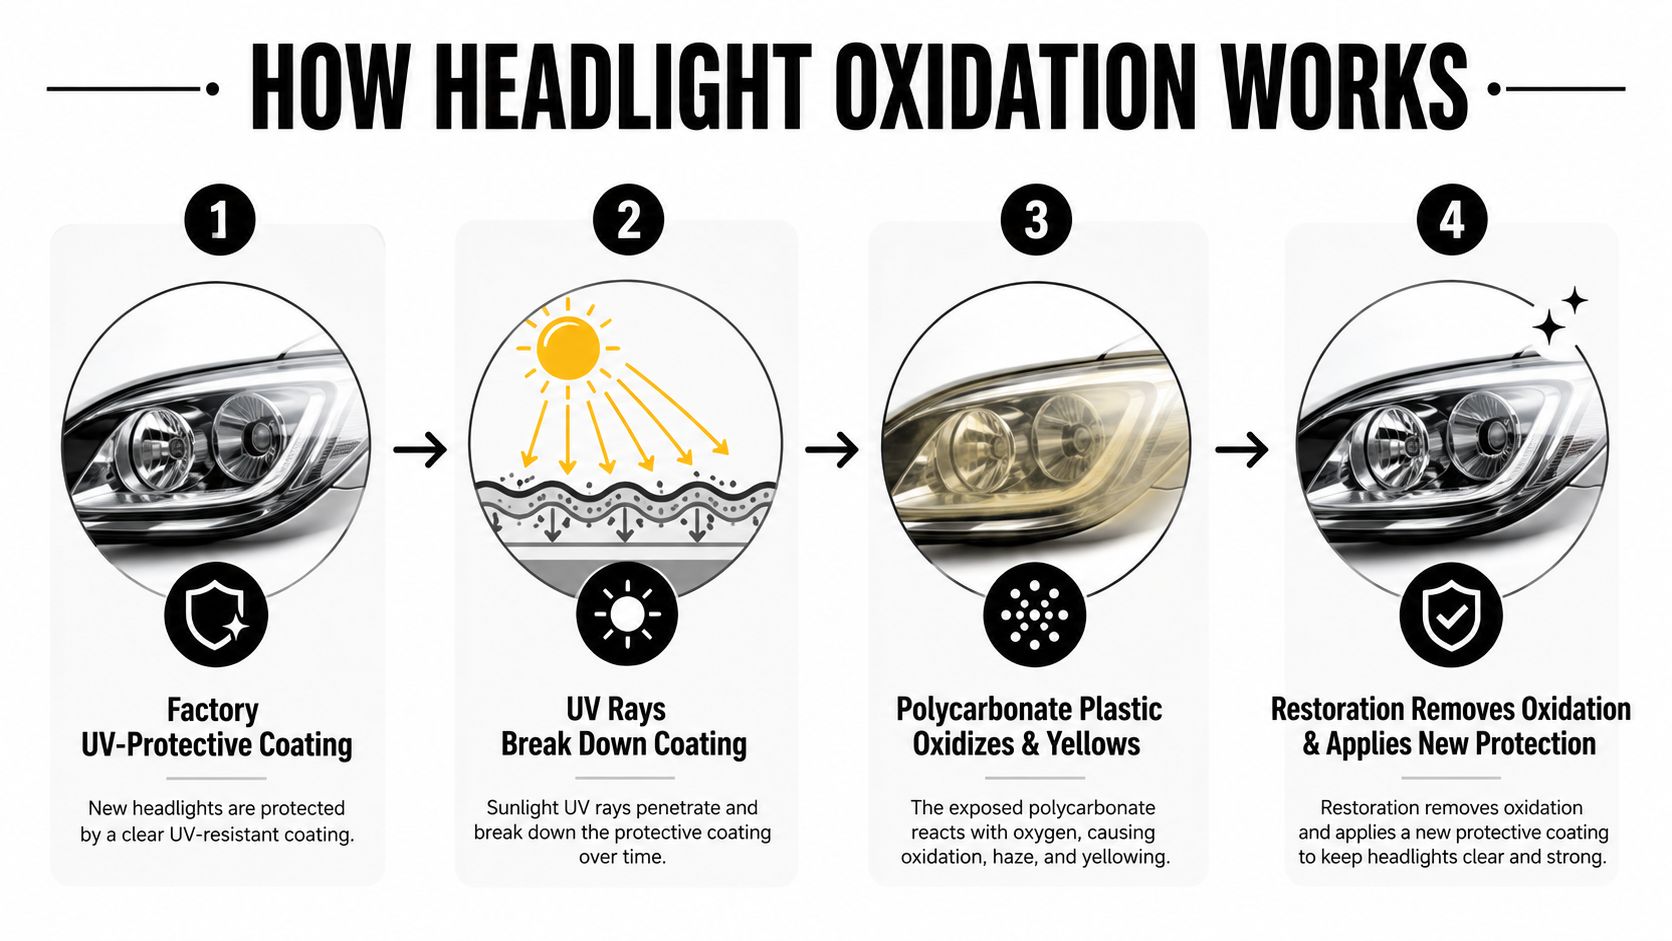
A headlight lens can lose a lot of usable light without looking broken. That is the part owners miss. Modern lamps are usually polycarbonate, not glass, and polycarbonate holds up well to impact, but it does not stay clear forever under UV exposure, road grit, wash chemicals, and winter grime. The factory clear coat wears down, the plastic beneath it starts to oxidise, and the lens turns yellow, hazy, or frosted.
That loss of clarity matters at night more than drivers typically notice until they meet glare on a wet road or a dark rural stretch. Light has to pass through the lens cleanly to stay focused. Once the surface clouds over, the beam loses shape and intensity before it reaches the pavement.
What the process is actually doing
Restoration works because it removes the damaged outer layer instead of trying to disguise it. The abrasive stages level the oxidised plastic, then finer grits remove the scratches left behind by the earlier sanding. After that, a UV-blocking coating goes on the lens so the newly exposed surface does not start breaking down right away. A manufacturer's restoration procedure lays out that sequence, from sanding progression to UV clear coat requirements, and the cure step matters because the protective layer does the long-term work. Manufacturer restoration procedure with sanding progression and UV clear coat requirements
That final coating is where a lot of DIY jobs fall short. Polishing alone can make a cloudy lens look better for a while, but it does not replace the lost UV barrier. Once the coating is gone, the plastic is exposed again, and the haze returns sooner, especially on vehicles that live outdoors through sun, rain, salt, and freeze-thaw cycles.
Ontario weather is hard on clear plastics. Sun in the warmer months, road salt in winter, and constant moisture all attack the lens surface in different ways. The same kind of breakdown shows up on painted panels too, which is why owners sometimes run into the same fading problem on other exterior surfaces. The reasons behind that are explained well in this article on what causes car paint to fade, and the same exposure pattern is why restored headlights need a real protective finish.
Why the finish matters in real weather
A proper restoration is judged by how the lens holds up after the work is done, not just by how smooth it looks on the bench. The surface has to survive sunlight, moisture, road film, and daily washing. That is why the UV-resistant topcoat is the durability control, not the last polishing pass.
I have seen plenty of lenses that looked acceptable the day they were polished and then went dull again because the protection step was rushed or skipped. That is also why some DIY kits disappoint, they can clean up mild oxidation, but they cannot change the fact that the lens still needs a durable barrier over the corrected surface. Owners comparing restoration options for different vehicles can also look at a practical example like the 06 Ram headlight guide from T1A Auto, because the same material limits and UV issues show up across makes and models.
A restored lens without protection is a short-term fix. A restored lens with a proper UV layer has a real chance to stay clear.
Signs Your Headlights Need Restoration Before You Drive at Night
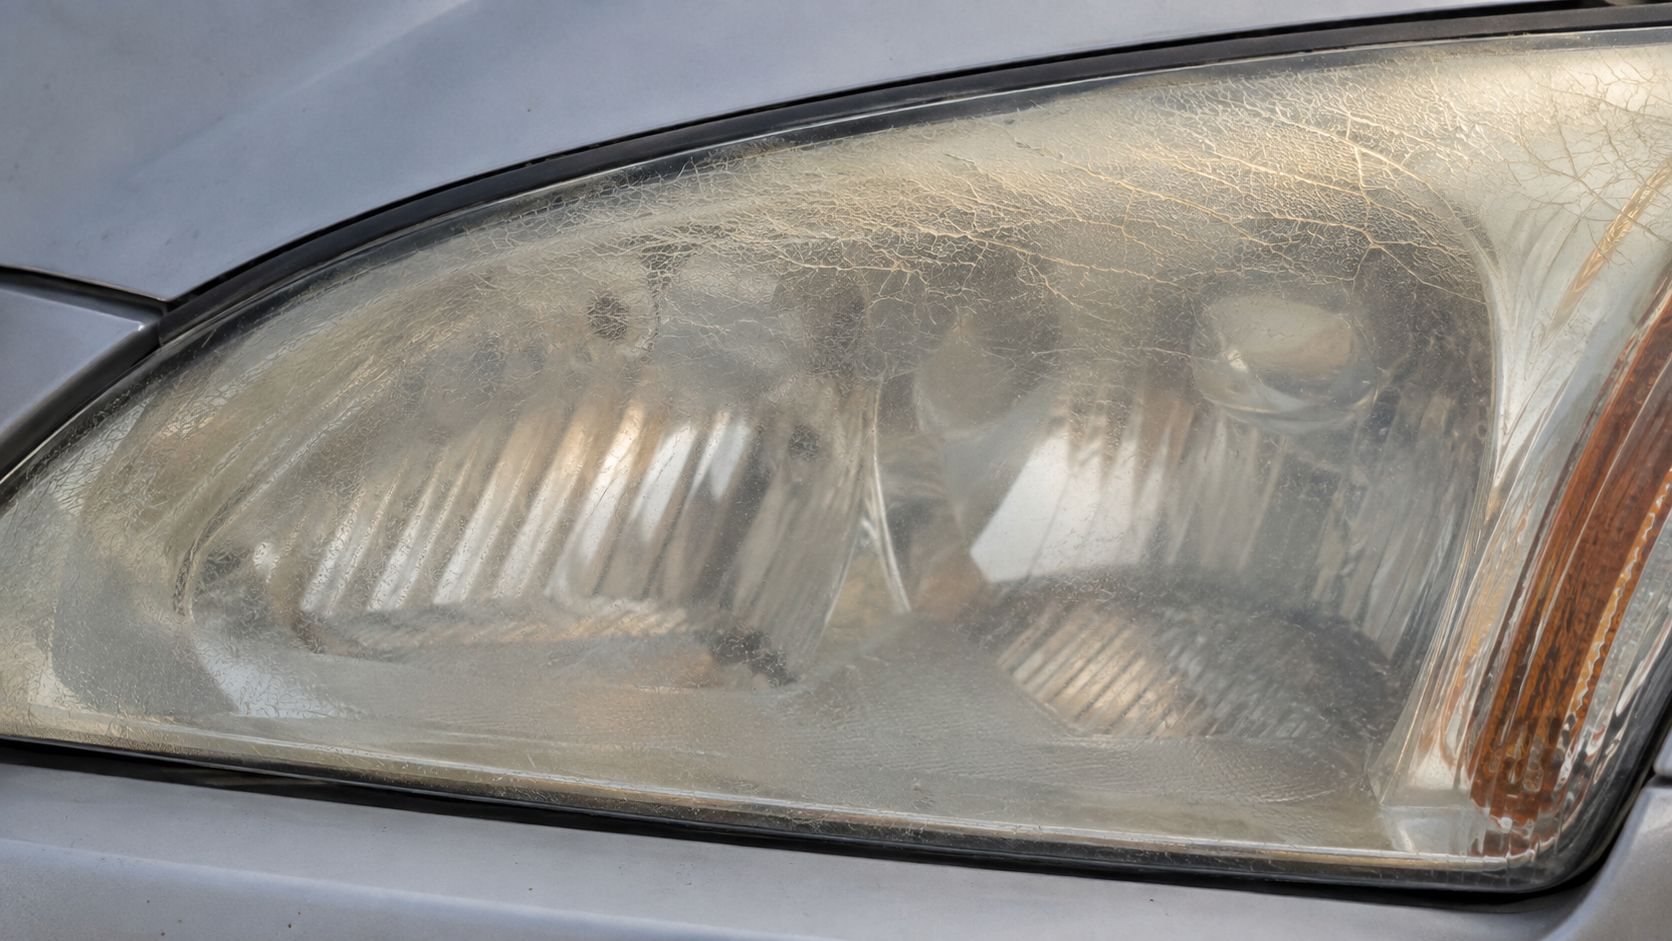
The first sign is usually colour change. Yellowing or browning means the outer layer is breaking down, and once the lens starts shifting colour, light output is already falling behind what it should be.
The second sign is a frosted or hazy look. If the lens doesn't look crisp when you stand in front of it under good light, it's usually scattering the beam rather than transmitting it cleanly. You can often see this in a driveway before you ever switch the lights on.
Quick self-check
- Colour shift: look for yellow, tan, or brown tint in the lens.
- Surface haze: check for a cloudy or frosted appearance when the light is off.
- Cracking or crazing: inspect for fine surface lines, especially near the hottest parts of the lamp.
- Beam scatter: park facing a wall at night and compare the light pattern to what you remember when the car was newer.
A lot of owners adapt to poor lighting without realising it. The beam gets dimmer over months, so your eyes adjust and your brain normalises the change. That's why a quick visual inspection in the driveway is worth doing before every long night drive, especially if you commute on rural roads or heavily travelled freeway stretches.
If you want a good real-world reference point for what a modern truck lamp should look like, the 06 Ram headlight guide from T1A Auto is a useful comparison because it shows how much design and lens condition affect the front-end lighting picture. Pair that kind of observation with a basic inspection habit, like the one covered in this auto inspection station guide, and you'll catch deterioration before it becomes a visibility problem.
DIY Headlight Restoration Kits vs Professional Service
DIY kits can work, but they're not equal to a full professional job. The cheap ones often give you enough material to improve appearance, yet they can fall short on the abrasive steps and the coating that determines how long the result holds up.
| Factor | DIY Kit | Professional Service |
|---|---|---|
| Upfront cost | Usually lower | Usually higher |
| Result quality | Can improve clarity, but varies by kit and user | More consistent, especially on heavily oxidised lenses |
| Longevity of finish | Often limited if protection is weak or skipped | Better when a proper UV coating is used |
| Skill required | Moderate, with room for user error | Lower for the owner, because the shop handles the process |
Where DIY makes sense
A DIY kit can be reasonable if the haze is mild, you're comfortable following directions carefully, and you're willing to accept that the finish may need redoing sooner. The better kits include abrasives, polishing material, and some form of sealant, but results still depend on how thoroughly the process is done.
Where professional service wins
A shop has better control over masking, sanding consistency, polishing, and coating application. That matters on cars that live outside, on newer vehicles with expensive lamps, or on lenses that have gone beyond simple haze and into heavy yellowing or surface damage. In practice, the more important the headlights are to your daily driving, the more sense a professional restoration makes.
For owners comparing options in the local market, a service page like car detailing in Pickering can be a helpful way to think about the broader care level a shop offers, even if the task here is specifically lighting. I usually tell people to choose DIY when they want a weekend project and are fine learning through trial and error, and choose a pro when they want a more durable finish and less guesswork.
Best fit: DIY for mild haze and hands-on owners, professional service for severe oxidation, repeat failures, or anyone who drives at night often.
The Professional Headlight Restoration Process and What to Expect
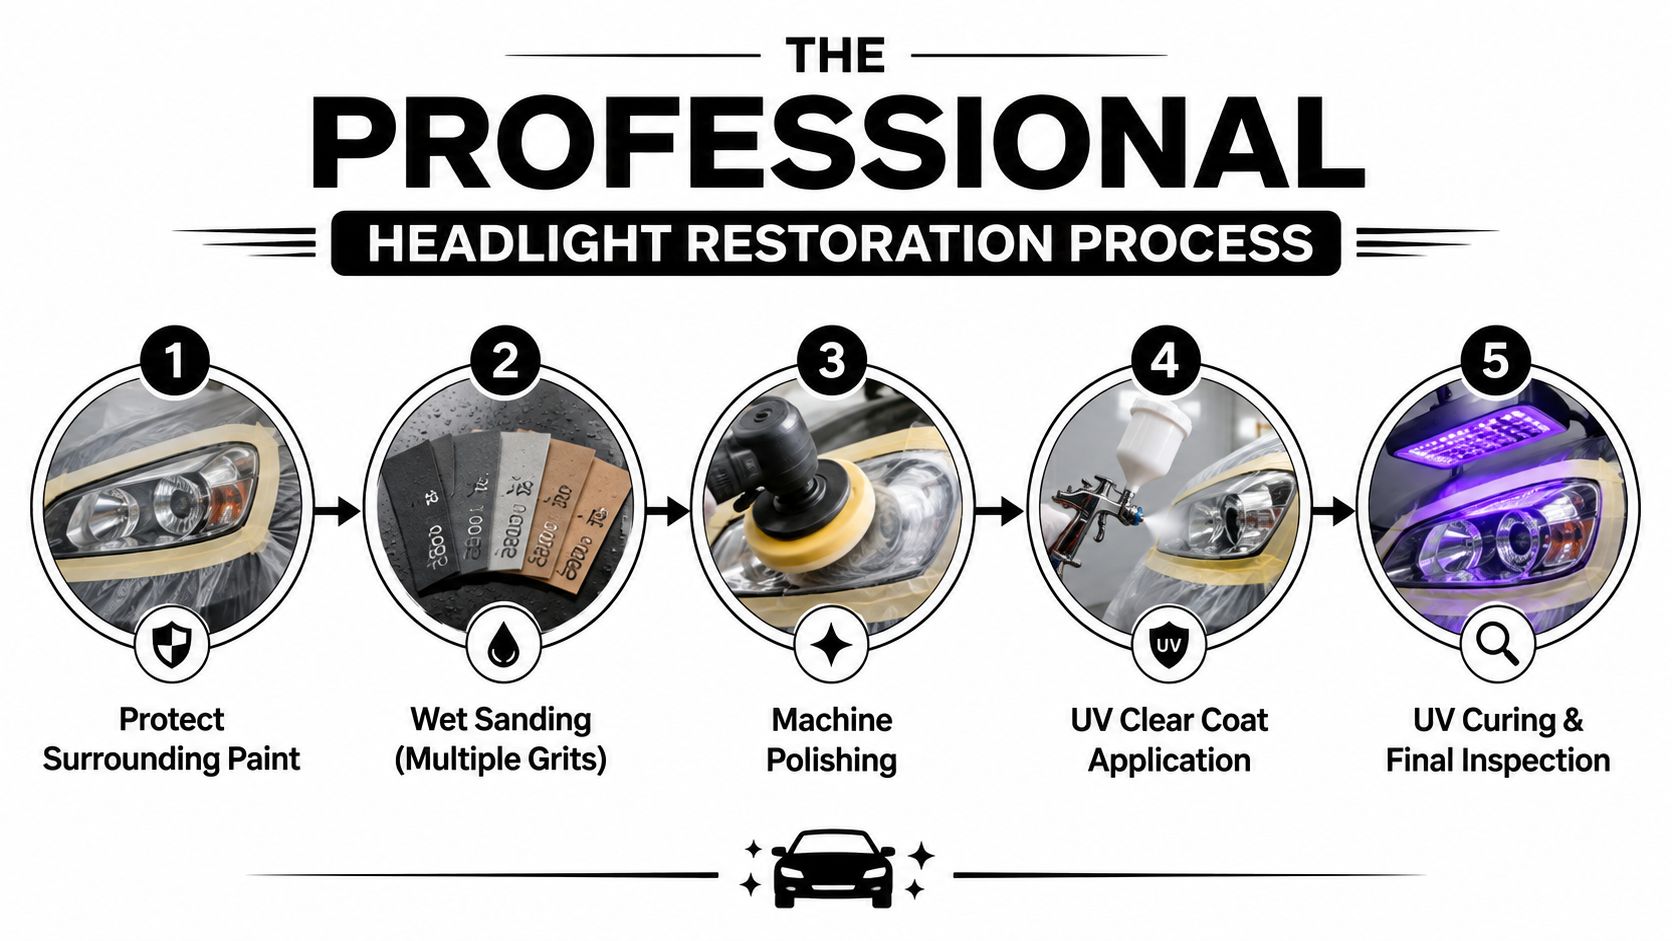
A proper restoration starts with inspection, because the lens may be cloudy for more than one reason. A technician checks for outside oxidation, surface damage, and deeper failure before touching the plastic, since sanding helps only when the problem is on the outer layer. The surrounding paint, trim, and any nearby bodywork then get masked so the cure does not create a new repair bill.
What the restoration process does
- Cleaning and masking. Dirt and road film come off first, and the surrounding paint needs protection before any abrasive work begins.
- Wet-sanding in stages. A serious process uses more than one grit, because each pass has to remove the scratches left by the previous one.
- Polishing. This step restores clarity after sanding and removes the final haze left by the abrasive stages.
- UV clear coat application. This is the protection step, and it helps slow the return of yellowing and surface breakdown.
- Curing and inspection. The coating needs time to set, and the final check should confirm even coverage and consistent clarity.
The sanding progression matters because the lens has to be leveled before it can be refined. Professional procedures commonly move through several grits, often starting around 500 or 800 grit and working up to 3000 grit, with machine work typically kept in a controlled range so the plastic is cut evenly instead of overheated or gouged. Manufacturer restoration procedure with sanding progression and cure guidance
The coating step is where rushed work often falls short. Skip the UV layer, or apply a weak one, and the lens can haze again much sooner under sunlight, salt, and daily road exposure. That is the trade-off owners need to understand, restoration can recover a great deal of lost output, but replacement is still the right call when the lamp assembly itself is damaged or no longer holds a proper finish. AAA consumer guidance on restoration and replacement
A good appointment leaves you with two things, clearer lenses and a straight answer about what was done to get there. If a shop will not explain its coating choice or cure process, I would treat that as a warning sign. For drivers comparing service quality, a page like car mechanic services is a useful reminder that the best shops talk plainly about the work, the limits, and the protection step that keeps the result from failing early.
Protecting Restored Headlights and Choosing a Trusted Shop in Whitby
A restored lens stays clear longer when the owner treats it like exposed plastic, not like polished glass. Regular washing helps, but harsh chemical cleaners can strip protection faster than people expect, so a mild wash routine is the safer habit. Parking indoors or using a cover when the car sits for long periods also reduces the UV load that drives oxidation in the first place.
Ontario weather is its own problem. Freeze-thaw cycles, road salt, and winter abrasion are hard on any finish, which is why the protection layer matters so much after restoration. Consumer kits and instructions often tell you to use a UV sealant or clear coat, and that advice is right, but they rarely answer the bigger practical question of how long the finish will hold in real Canadian conditions. That's one reason a durable coating, applied correctly, is the best defence against repeat haze.
What to look for in a shop
- Clear process: the shop should explain sanding, polishing, and sealing, not just “buff the lights.”
- UV protection focus: if the coating step sounds optional, keep looking.
- Local experience: Ontario driving conditions are tougher on finishes than a mild garage-kept climate.
- Straight answers: a trustworthy technician will tell you when restoration makes sense and when replacement is the better call.
For Whitby drivers, choosing a shop with a strong general repair and appearance-care background can simplify the decision. Carmedics Autowerks has broad auto-service experience, and their car mechanic page is a good starting point if you want a team that understands more than just the one repair in front of you.
Restoration is worth doing when the lens is oxidised externally and the housing is otherwise sound. It's not the right answer for every modern lamp, especially if the problem is internal or structural. A good shop will tell you the difference, protect the surrounding paint, and use the finish that gives the best chance of surviving a Canadian winter.
If your headlights are cloudy, dim, or starting to scatter light, book a professional inspection with Carmedics Autowerks Inc and get a straight answer on restoration versus replacement. They offer expert auto repair, careful detailing work, and protection services for Whitby drivers, and you can visit Carmedics Autowerks Inc to schedule a consultation and keep your nighttime visibility where it should be.